
7 Things You Probably Didn't Know About Figs - http://huff.to/1Bq6DOW

Custom Search
Showing posts with label fruit and vegetable garden. Show all posts
Showing posts with label fruit and vegetable garden. Show all posts
Sunday, August 17, 2014
Wednesday, August 13, 2014
Garden Vegetable Pizza: From Garden to Table

Garden Vegetable Pizza
Makes 1 pizza
Ingredients
- Pizza Dough (recipe follows)
- Garden Vegetables and Herbs on Hand (e.g., bell peppers, onions, tomatoes, garlic cloves, parsley)
- Olive oil (for sauteing)
- 3/4 c. Pizza Sauce or Red Pasta Sauce
- 8 oz. Shredded Cheese Blend of your choice
- Mozzarella (optional)
- Set rack to lowest position and heat oven to 500 degrees F.
- Divide dough in half on lightly floured counter. Place one half of dough under plastic wrap, and work the other half of dough into 8-inch disc. Then continue to work and stretch the dough (flipping dough occasionally) until dough is 12 to 14 inches in diameter.
- Place dough on pizza stone or overturned rimmed baking sheet. Place dough in preheated oven, and bake for 8 minutes.
- In the meantime, slice garden vegetables into 1/4-inch thick slices, and chop herbs. Heat oil in frying pan, and saute vegetables and herbs until vegetables are tender.
- Pour sauce on the center of the cooked dough and use back of large spoon to spread sauce evenly around the pizza, leaving about 1/2-inch border free of sauce.
- Add shredded cheese and bits of mozzarella. Spoon sauteed vegetables onto pizza.
- Return pizza to oven for 3 more minutes or until cheese has melted.
- Transfer pizza to cutting board. Slice and serve immediately. Repeat these steps for 2nd pizza or save the 2nd dough in refrigerator for tomorrow.
Pizza Dough Recipe
Makes dough for two 14-inch pizzas
Ingredients
- 2 c. all-purpose flour
- 2 c. wheat flour (and extra flour for shaping dough)
- 2 1/4 tsp instant or rapid-rise yeast
- 1 1/2 tsp. salt
- 2 Tbsp. olive oil
- 1 1/2 c. water, heated to 110 degrees
- Pulse 4 c. flour, yeast, and salt together in food processor (fitted with dough blade) until combined, about 5 pulses. With food processor running, slowly add oil, then water; Process until rough ball forms, 30 to 40 seconds. Let dough rest for 2 minutes and then process for 30 seconds longer.
- Transfer dough to lightly floured counter and knead by hand into smooth round ball. Place dough in a large, lightly greased bowl. Cover bowl tightly with plastic wrap, ad let rise at room temperature until doubled in size (about 1 to 1 1/2 hours).
Monday, October 8, 2012
Woolly Aphids Attacking Apple Tree
 |
| Photo: Woolly Aphids on Apple Tree |
.jpg) |
| Photo: Crushed Woolly Aphids on a Napkin |
I noticed something that initially appeared to be white fungus on my apple tree. However, upon closer inspection, I discovered the white fungus was actually woolly aphids!
Woolly aphids are aphids that feed on the sap of a plant and secrete a substance that resembles white cotton or wool. Symptoms of feeding may include twisted and curled leaves, yellowed foliage, poor plant growth, low plant vigor, and branch dieback.
I pruned back what I could to slow down the aphid growth, and I will try out a recipe for homemade insecticidal soap on the remaining aphids. If it ends up being effective, I will share the recipe in a later post.
Note: To determine whether you have woolly aphids on your tree, all you have to do is rub the white substance. If a purple stain appears, then you have a woolly aphid problem on your hands; not fungus.
Thursday, July 12, 2012
First Crop of Grapes
 |
| Photo: Grapes Developing on Vine |
After three years of waiting, our grapevine has finally produced three bunches of grapes! They have not fully matured yet, but I had to capture this moment before the birds start pecking at them.
Tuesday, July 10, 2012
Harvesting Scallion or Green Onion Seeds
 |
| Photo: Last Season's Scallion Seeds Sprouting |
 |
| Photo: Scallion or "Green Onion" Seed Head |
Turn left over green onion stalks into a whole bed of scallions. All you have to do is plant the unused scallions in the soil, and allow at least one stalk to thicken and flower. The flower will eventually form seeds, which you will use to plant a new bed of green onions. You can continue to take cuttings from the other scallions for cooking.
You will know when the seeds are ready to be harvested when the stem of the plant turns yellow, and you may even see some of the black seeds ready to spill out.
Cut the stem under the seed head during a dry time of the day. To save the seeds all you need to do is shake the black seeds into a bag or shake the seeds directly into your garden bed. The seeds should sprout within a week as long as you provide adequate water.
Sunday, June 3, 2012
Thornless Raspberry Canes Bearing Fruit
 |
| Photo: Canby Raspberry Ripening |
 |
| Photo: Canby Raspberry Buds Developing Into Fruit |
I ordered my Canby Raspberry canes from eBurgess.com earlier this year, and I am surprised these bare sticks formed fruit the first year. The berries are delicious, and are also a pleasure to pick since Canby Raspberries have no thorns!
Saturday, June 2, 2012
Tips on Growing a Tastier Tomato
Did you know over-watering your tomato plant can dilute the taste of the tomato? You can also water your plants with sea water or brackish water to bring out deeper flavors of the tomato. For more tips, click on the following link: How To Grow The Tastiest Tomato? One Secret's In The Soil
Sunday, April 22, 2012
Happy Earth Day!
 |
| Borage Seeds from last year are emerging from the soil |
Happy Earth Day everyone! Sunny and warmer days are finally here, and I have been hard at work in the garden.
 |
| Newly Planted Strawberry Surecrop Bed |
New Transplants:
- Strawberry "Surecrop" - I planted a new bed of surecrop strawberries. These were advertised to be high-yielding crops at an average of 3 pints of berries per plant, and is supposed to be a consistent producer.
- Early Girl Tomato - This hybrid tomato plant is an early producer and is supposed to bear 5oz fruits.
- Grape "Catwaba" - These grapes are supposed to be great for making jams and jellies, and even red wine or champagne. I will have to patient because this is its first year, and grapes generally produce fruit in their second or third year.
- Raspberry "Thornless Canby" - This plant is suppose to produce extra large, bright red raspberries, but I chose it mostly because it is thornless.
- Horseradish
- Jalapeno
From Seed:
- Radish "Early Scarlet"
- Spinach "Bloomsdale"
- Red Giant Mustard Greens
- Cantelope
- Black Zuccini
- Bell Pepper "Yellow Monster"
- Watermelon "Sugar Baby"
- Elephant Garlic
- Edamame
- Sugar Snap Peas
- Bell Pepper "Horizon"
- Stuttgarter Giant Onion
- Swiss Chard "Northern Lights"
- Anise
- Balm
- Siam Queen Thai Basil
- Sweet Basil
- Caraway
- Fragrant Lavender
- Chives
- Horehound
- Sweet Marjoram
- Peppermint
- Sage
- Summer Savory
- Dill
- Calendula
- Marigold
- Sunflowers
- Carnation (mix)
Cuttings - I am attempting to propagate the following plants by cuttings.
- Maple Tree (green)
- Purple Ice Plant
- Geraniums
- Mosquito (repelling) Plant
- Hydrangea
Saturday, December 24, 2011
Winter Gardening in California
I love California for many reasons, but one of them is being able to garden throughout the winter! Here are some of the things still growing in the garden in December:

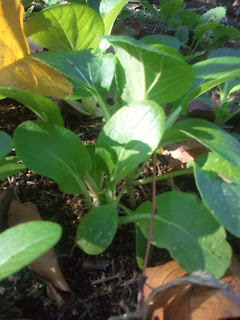


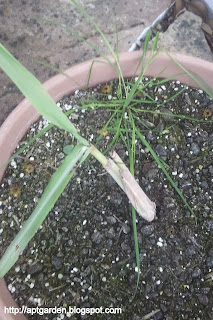

Photo: Romaine Lettuce

Photo: Bok Choy

Photo: Mustard Greens

Photo: Cilantro

Photo: Salad Greens going to seed

Photo: Bell Pepper
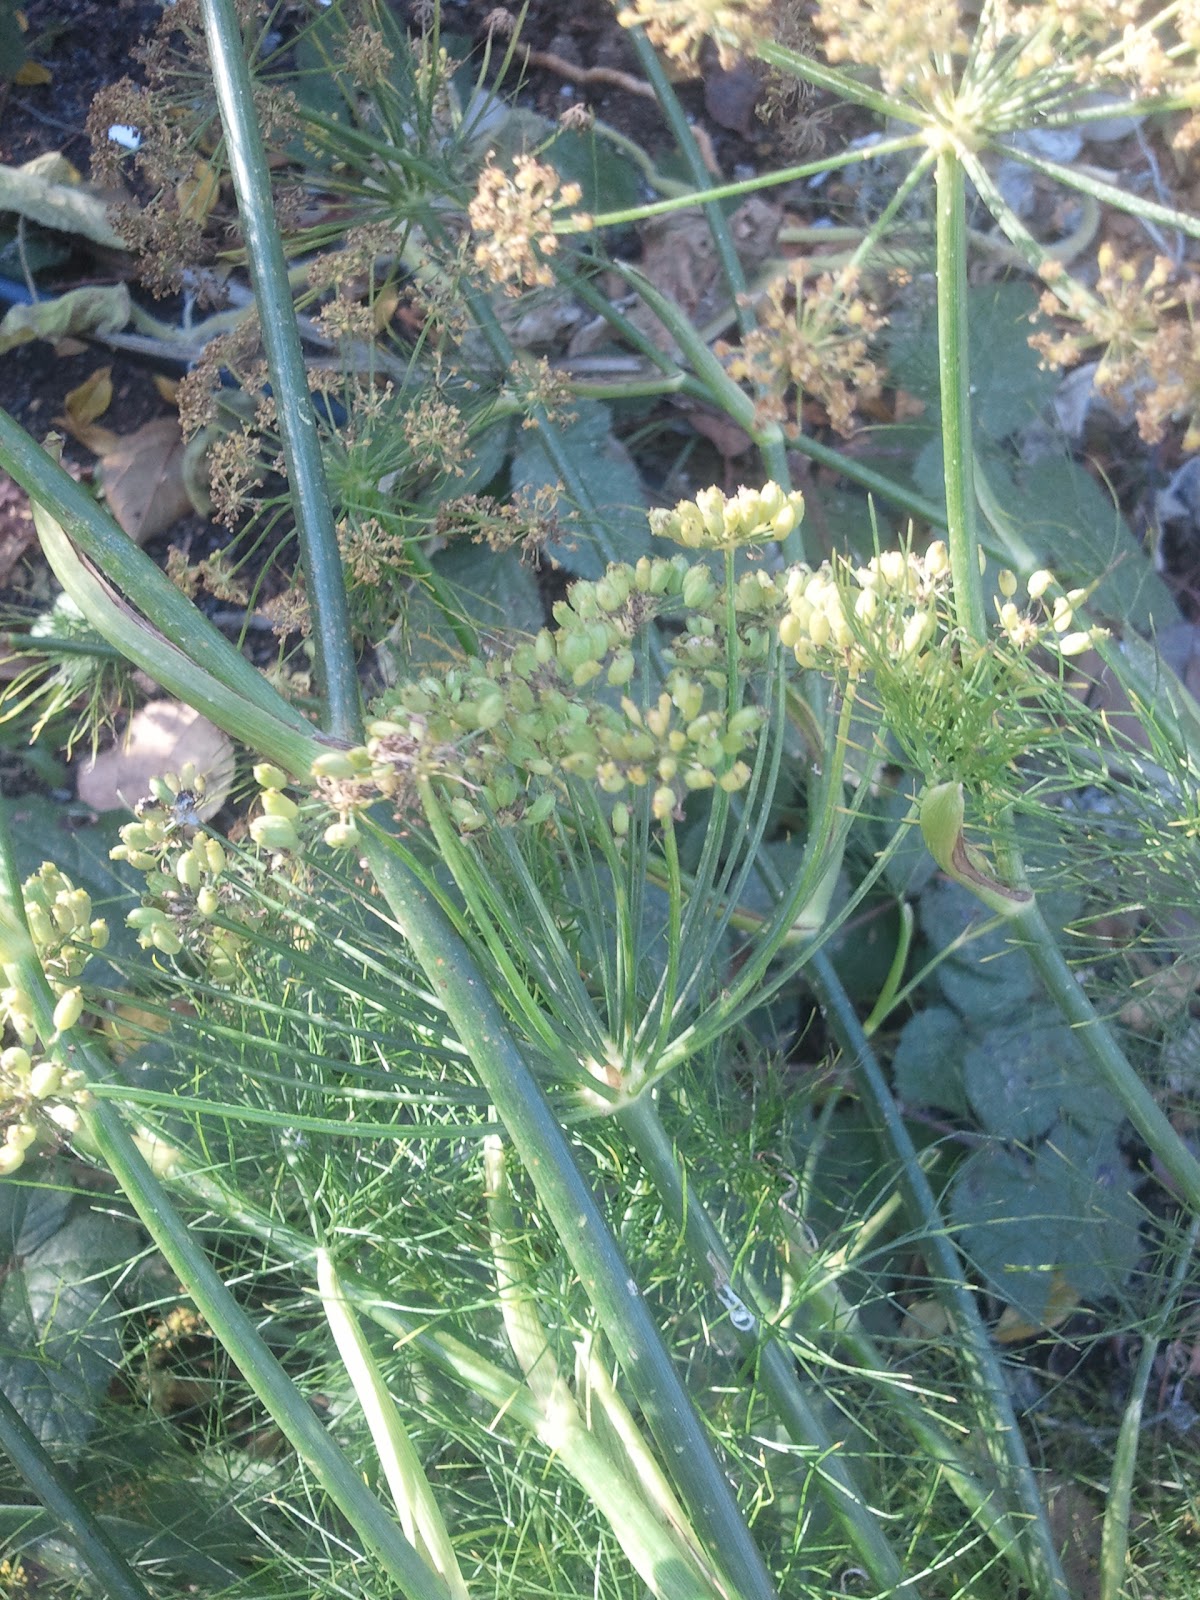
Photo: Fennel going to seed

Photo: Tomato seedlings planted in late summer

Photo: Scallions (Green Onions) going to seed

Photo: Pineapple plant grown from planting pineapple head

Photo: Lemon grass shoot given to me by a friend
Our zucchini plant was also still producing zucchini, but I uprooted it because the zucchini were small. Carrots, onions, shallots and garlic are also still growing as well as sage, English thyme, lemon thyme, rosemary, parsley, and oregano. Our lime tree is still flowering and setting tiny fruit.
In general, the plants are growing at a much slower rate. I think next year I will try row covers or set up cold frames to see if that will improve growth.
Monday, October 3, 2011
Harvesting Butternut Squash

Photo 1: Butternut Squash Flower

Photo 2: Young butternut squash growing on the fence.

Photo 3: Butternut squash almost ready for picking

Photo 4: Butternut Squash Harvested (unwashed)
I am a huge fan of butternut squash soup! I planted 2 butternut squash plants earlier this year, and they have taken over the garden. So far we have harvested 3 nice size butternut squash, and there are still more to come. During the growing season, I snipped off any small, rotting butternut squash and threw them away to help redirect energy to the healthy butternut squashes.
The butternut squash are ready to be picked when there are no longer green streaks on the skin, and the stem has turned brown. Cut the squash from the vine, leaving at least an inch of the stem attached. Disinfect the butternut squash by dipping it in a weak bleach solution, and then dry the squash. Store the squash in a cool, dark place. When stored properly, butternut squash can last several months.
Friday, September 30, 2011
Korean Star Melon Surprise

Photo 1: Korean Star Melon

Photo 2: Korean Star Melon Seedlings.
I threw scraps of Korean Star Melon into my worm compost bin weeks ago. When I checked on my compost bin, I discovered the seeds had sprouted! I transferred the seeds into my garden. Let's see what happens.
Wednesday, September 28, 2011
How To Tell When To Pick Carrots

Photo: Danver's Half Long Carrot
It is difficult to tell whether carrots are ready for picking by just looking at their leafy, green tops. To avoid accidentally pulling up carrots prematurely, try this tip. Pull the soil away from the base of the stem until you expose the top of the carrot root. See Photo Above. Generally, if the top of the carrot root is as thick as an adult carrot, it is ready to be harvested.
Sunday, July 31, 2011
Tomatillos

Photo 1: Tomatillo fruit

Photo 2: Tomatillo flower
My tomatillo plant is finally forming fruit! See Photo 1. I was getting a little worried. My tomatillo plant had been forming plenty of flowers for months without producing any fruit. I am still not sure why it is not just starting to form fruit.
I have not noticed much of a weather change, and there have been plenty of bees and other pollinating insects in the garden. The only thing I did differently was increase the amount of water I was giving it. I have been fully saturating the ground with water everyday.
Tuesday, July 26, 2011
Planting Pumpkin Seeds for Halloween

Photo: Young pumpkin plant
I planted a couple of pumpkin seeds directly in the soil earlier this month. I hope I planted them in time for Halloween! I would love to have a porch full of Jack-o-Lanterns.
Monday, July 25, 2011
How to Harvest Spinach Seeds
 |  |  |
Materials
- 5 gallon bucket or brown grocery paper bag
- Garden shears
- Strainer with 1/4-inch to 1/2-inch holes
- Large bowl to catch seeds as they fall
- Seed container (e.g., envelopes, plastic snack bags, etc.)
Directions
- You will know when spinach plants are ready to form seeds when they shoot out a stalk that produces flowers. These blooms will disappear and seeds will form in its place. See Photo 1.
- You should collect the seeds when the plant is dry so avoid collecting them in the early morning or after they have been watered.
- Use the garden shears to cut the spinach stalks off.
- After you cut the stalks, place them in the bucket or paper bag upside down. Allow the seeds to completely dry out in a cool, dry location.
- After the stalks have dried and turned brown, start collecting the seeds. See Photo 2. Place the strainer over the bowl. Then use your hand to strip the stalk of its seeds using one fluid motion. See Photo 3.
- Remove the strainer. You can repeat the straining process if you would like to remove more of the leaves.
- Label the seed container with its name and date collected (if desired). Then pour the seeds into your seed container. Store seeds in a cool, dry location until you are ready to plant them in the garden. See Photo 4

Photo 1: Seeds forming on spinach.
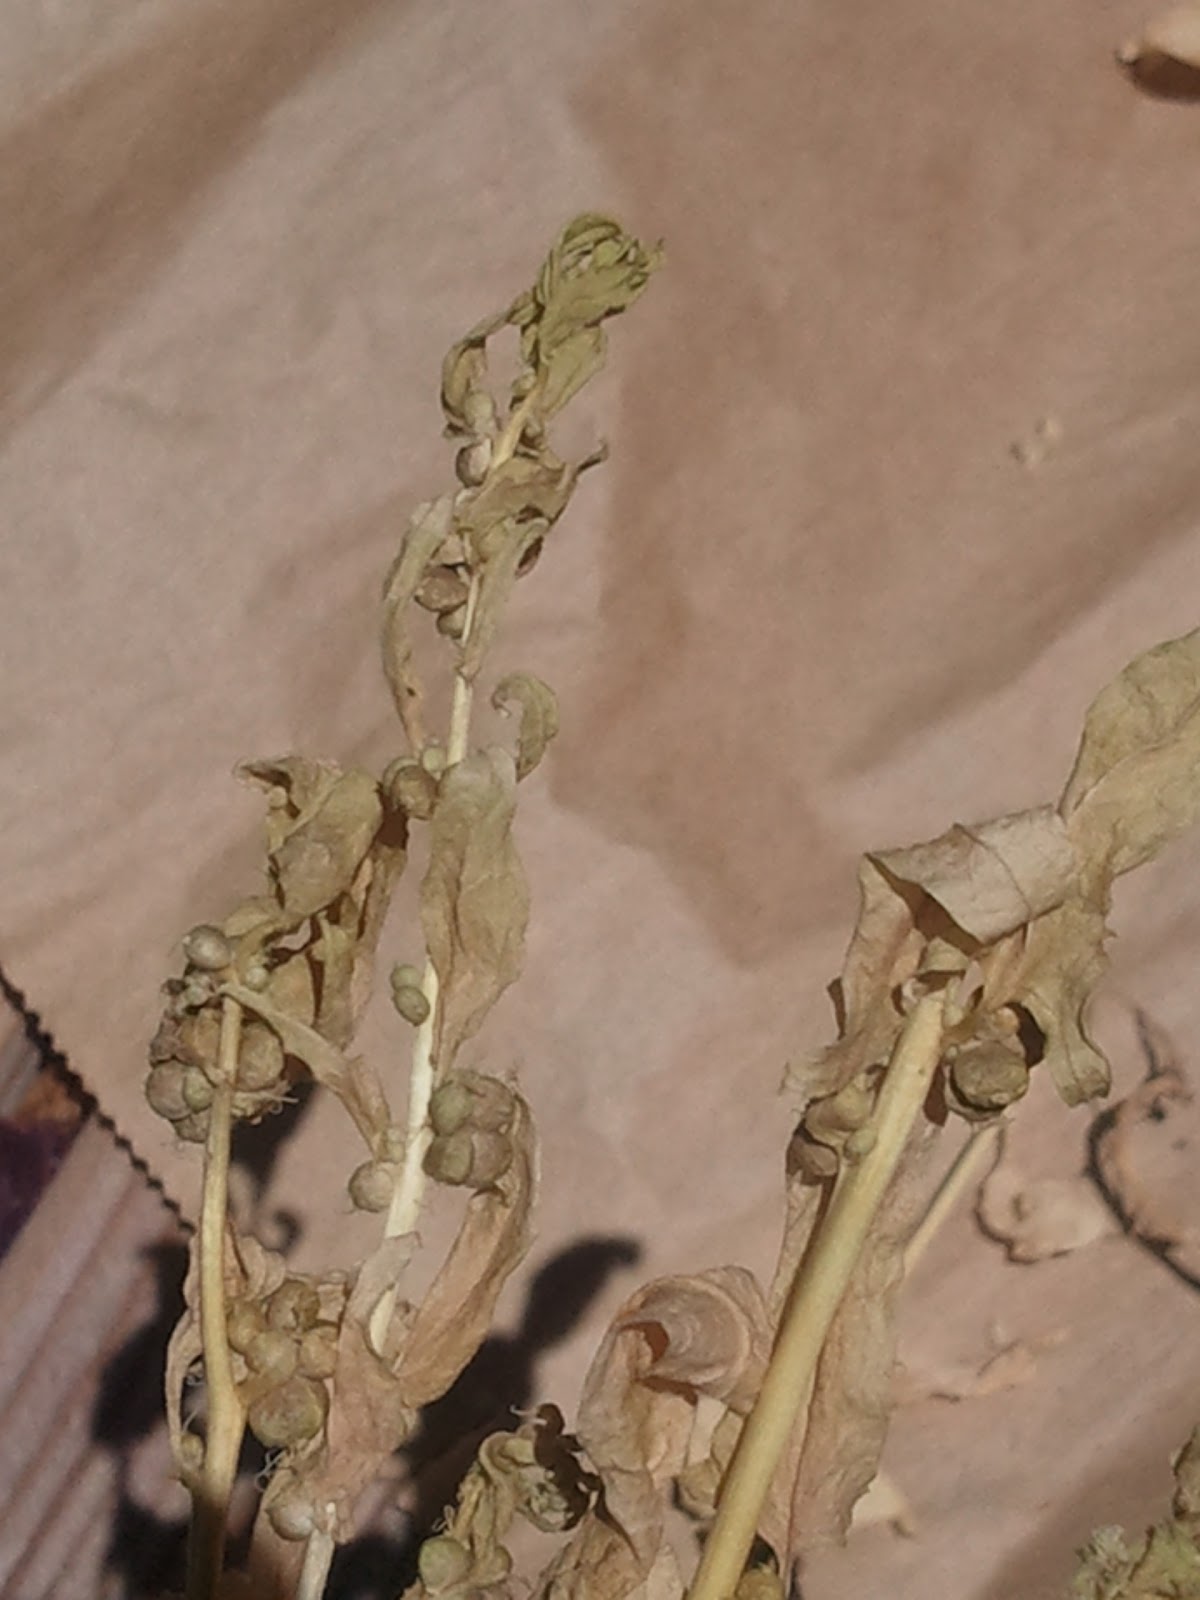
Photo 2: The little balls on the dried spinach stem are seeds.

Photo 3: Seeds and dead leaves are stripped from the stem.

Photo 4: Spinach seeds in a plastic snack bag.
Monday, July 4, 2011
Tomato Stem Split in Half

Photo: Attempting to repair a split tomato stem with strips of plastic from plastic grocery bags
I was careless in the garden with my Pink Brandywine tomato plant that was already forming fruit. The stem split in half at a long diagonal. Instead of starting all over, I had two options. I could piece it together and hope the halves fuse back together or I could stick the other half in the ground and hope it takes root.
I decided to try and piece the halves together using strips of plastic taken from a plastic grocery bag. I first cut small strips to tie the stem back together. Then I took long strips to wrap the two pieces more firmly back together. Part of the tomato plant looks a little sad and wilty. I am hoping it survives.
Sunday, July 3, 2011
How to Harvest Bok Choy Seeds

Photo 1: Bok choy plant forming seed pods

Photo 2: Sunlight is illuminating the bok choy seeds inside the pod.

Photo 3: Bok choy seed pods fully mature and brown.

Photo 4: Collecting seeds from bok choy plants
You probably have noticed that some of your plants have grown tall, flowered and formed seed pods. Instead of cutting these plants down and chucking them in the trash or compost, harvest your seeds for your next planting. It is easy to do, and saves you from buying more seeds. I collected more seeds from one single bok choy plant, than what would come in an average seed packet. I share my extra seeds with family and friends.
How to Harvest Bok Choy Seeds
Materials:
- 5 gallon bucket or brown grocery paper bag
- Garden shears
- Strainer with 1/8-inch to 1/4-inch holes
- Large bowl to catch seeds as they fall
- Seed container (e.g., envelopes, plastic snack bags, etc.)
Directions:
- You will know when bok choy plants are ready to form seeds when the bok choy plants grow tall and produces flowers. These blooms will disappear and seed pods will form in its place upon pollination.
- You should collect the seeds when the plant is dry so avoid collecting them in the early morning or after they have been watered.
- When some of the seed pods start to turn brown, use your garden shears to cut the plant at the base of its stalk. Note: You can wait until the pods turn completely brown to skip the drying process (step 4), however, you risk some seed pods opening and releasing seeds into the garden. See Photo 3. You can also cut the stalk when the pods are still green, but do not cut them too early. If you do, you risk ending up with little to no seeds. I chose to harvest my seeds a little early because I have a small garden, and I am eager to reuse that garden space. See Photo 1.
- Tip: To find out whether your seed pods have seeds in them, hold them up against the sunlight. Turn the pod so that the sun will hit the pod in a way that illuminates the contents inside. If you see round seeds inside about (about 1/8" in diameter), you can cut the pods off for drying. See Photo 2.
- After you cut the stalks, place them in the bucket or paper bag upside down. Allow the seeds to completely dry out in a cool, dry location.
- You may notice that some of the seeds have already been released in the bucket or paper bag during the drying process. This is a good sign. Place the strainer over the large bowl. Then take a seed pod and use your hands to split it in half lengthwise to release the seeds. You may have to twist or rub the pods a little to work the seeds loose. The small brown seeds will fall through the strainer into the bowl, but bigger pieces of debris will remain in the strainer. After you break your last pod, dump the rest of the contents of the bucket or paper bag into the strainer to collect any remaining seeds. See Photo 4.
- Remove the strainer. Then pour the seeds into your seed container. Label the seeds with its name and date collected. Then store seeds in a cool, dry location until you are ready to plant them in the garden.
Last Updated: July 25, 2011

Saturday, July 2, 2011
Danver Half Long Carrots

Photo: Danver's Half Long Carrots and Mixed Lettuce Leaf
I harvested a few Danver's half long carrots the other day. They roasted beautifully in the oven next to the chicken, garlic and onions. The carrots retained a lot of its flavor and texture throughout the roasting process.
This is my first time planting carrots. Having crumbly, garden soil and an automatic watering system makes it super easy to grow them. I planted 16 carrot seeds per 1 square foot to maximize planting space. I initially planted 2 square feet of carrots (i.e., 32 carrots) with the intention of reseeding 1 square foot at a time for a continuous supply of fresh carrots, but I am thinking about planting more.
I chose Danver's half long carrots because I do not have a deep garden bed. However, you can technically harvest carrots at anytime (i.e., from baby size to full length size).
Sunday, April 17, 2011
Tomatoes: Transplants vs. Seeds

Although tomatoes are easy to start from seeds, I purchased several different varieties of heirloom tomato transplants from Home Depot. They were selling them for $3.48 each, and they came in 5" peat pots. So why did I purchase transplants if tomatoes are so easy to grow from seeds?
- Early Harvesting Time. Transplants have been started indoors from seeds several weeks prior to the spring planting season. This means my newly purchased tomato transplants will set fruit much earlier than a tomato plant started from seed during the normal planting season. It will continue to set fruit until the first frost in fall.
- Cheaper for People with Limited Gardening Space. Unless you harvest seeds from an heirloom tomato from the market or can get them on the cheap, it may be slightly more expensive to buy a standard pack of seeds. For example, Burpee is selling a packet of 50 Black Krim seeds for $3.95. That packet of seeds cost $0.47 more than a transplant.
- Limited Space. I do not need 50 Black Krim tomato plants. I only want one for now. I do not have the space for it, and I am more interested in having a variety of plants in my garden.
- Free Future Seeds. I can still easily save seeds from the tomatoes my transplants will produce this year, and start my own transplants early next year.
Sunday, March 27, 2011
5 Priority Planting Tips To Maximize Your Grocery Bill Savings

Photo: 4 ears of corn cost $5.99 at our local Safeway
- Give Expensive Produce Priority Planting. Think about the foods you love or frequently use, then walk down the produce aisle, and get an idea of what these items cost. Take in account that out-of-season produce will generally cost more than it would be in-season. Then give the pricey items priority planting. For example, I love corn. Our local Safeway is selling four ears of sweet corn for $5.99. I also know that the price of corn has increased dramatically, and will continue to rise so I will be planting sweet corn
in my garden this year. Sweet corn will have priority over vegetables like broccoli because broccoli is only $0.79 per pound and it has a long shelf-life.
- Plant Food You Frequently Consume. I alluded to this in the previous point, but make sure you give priority planting to foods you actually consume frequently, and not just foods you love but rarely eat. For example, I frequently use tomatoes
and bell peppers
so I allotted a good chunk of my garden to tomatoes and bell peppers. For this reason, I will probably not plant eggplant this year although one of my favorite dishes is Thai green curry chicken. I do not eat eggplant often enough, and that space would be better utilized by planting vegetables I frequently consume.
- Plant Rare or Hard-To-Find Varieties. Heirloom vegetables are delicious, pricey and hard to find so why not try planting heirloom plants this year? Seed Savers Exchange, Fedco Garden Seeds, and Seeds of Change are some sources of heirloom seeds and/or plants.
- Plant Easily Perishable Produce. Plant foods that are easily perishable. For example, I love asparagus, but it has a short shelf-life. So this year, I purchased 3 different types of asparagus crowns. I planted them in the garden weeks ago and I already see thin asparagus shoots emerging from the soil. Because asparagus
is a perennial (meaning it will live for years without needing to be replanted) this small initial investment will provide me years of future enjoyment. I will have the freshest possible asparagus spears only steps away from the kitchen. If you want to grow asparagus for consumption, skip the seeds and purchase the crowns
- Don't Forget The Herbs. Many herbs
are easy to grow, and generally do not require a lot of space. They provide great flavor with a negligible amount of calories, and they are packed with vitamins and minerals that give our bodies many health benefits. Fresh herbs can also be pricey, they have a short shelf-life, and they are not always available at the grocery store. So invest a little time, money and space to an herb garden. Trust me, the next time you have a recipe that calls for a couple of tablespoons of four different herbs, your pocket book will thank you.
Subscribe to:
Posts (Atom)