Translate

Custom Search

Naturopathica

Showing posts with label apartment decorating. Show all posts

Monday, September 6, 2010

Adding a Little Whimsy


You can add a little whimsy to old plants by placing fake birds among the foliage.  I bought this bird at Michael's craft store for $2.29.  They had a variety of fake birds available in assorted sizes, and they even had speckled bird eggs for sale.

Tuesday, April 27, 2010

Birdie Planter


I came across this pretty, bird shaped bowl at Ross, and I thought it would make an interesting planter.  Ross was selling it 1/2 off for $9.99.  The bowl was somewhat shallow so I planted a drought-tolerant succulent.  I just have to figure out the perfect place to put this.  

Here is a photo of the bird bowl sans plant:


Tuesday, April 6, 2010

Low-Maintenance Housewarming Gift


I returned to Home Depot to pick up one of these succulent collections as a housewarming present for one of my friends.  She is really busy so low-maintenance, drought tolerant succulents was a perfect match for her.


As I was walking to the register, a woman stopped to ask me where I got them from.  She loved them too, and she was surprised they were only about $20.  I am feeling good about my purchase.  I think my friend will love her housewarming gift!


Clean Up Stragglers and Stretch Your $$$
If you happen to get a collection that looks straggly or overgrown, take a sharp knife and cut back the stragglers, but do not throw away these cuttings.  You can turn these cuttings into new plants.  Succulents are easy to propagate.  I normally just stick them in ordinary potting soil and keep the soil warm and moist (but not soggy) until they sprout roots.  If you wish to take the safer route, allow a "scab" to develop over the end of the stem by allowing the cutting to dry out a bit, then dip the cutting in some Rooting Hormone before planting them in the dirt.  

Thursday, March 25, 2010

Potted Succulent Mix at Home Depot


I saw these beautifully arranged potted succulents at our local Home Depot for only $19.98.  They have some interesting combinations.  If you have time, you should swing by and see what they have in stock.


Wednesday, February 17, 2010

Don't Throw Away Those Bulbs!


Last year one of my friends received a beautiful container full of beautiful, blooming tulips as a Valentine's Day gift. After the flowers died back, she innocently threw the pot away along with the tulip bulbs thinking her poor plant had died! She did not know that the tulips would bloom again the following year.

It just goes to show that you cannot take gardening information for granted. I wonder how many people accidentally threw away perfectly good plants or bulbs that have gone dormant. The next time you gift a live plant, you may want to explain what to expect to the gift recipient so she does not make the same mistake my friend did.

Friday, August 14, 2009

Twig Diffuser


Here is a neat idea to bring a bit of the outdoors indoors. Use Twig Diffusers ($14.99 on sale) in your bathroom, bedroom, living room, etc. They are much more attractive than standard diffusers, and gives your home a more organic, rustic feel.

Thursday, August 6, 2009

Bouquet of Succulent "Roses"


A couple of weekends ago I saved an overgrown, straggling looking rosette succulent. This plant is very easy to take care of and its year round beauty is priceless to have in an apartment garden so I knew I had to find some way to re-use this plant in my landscape. I wish I had taken a photo of this massive succulent before I trimmed it down so you could see the "before" and "after" pictures, but I guess I was just too anxious to get started.


I was really attracted to the huge, rosette blooms and thought they would make a gorgeous bouquet. I chose standard terra cotta pots because I noticed how the terra cotta really complemented the red on the rim of the "petals." I took a sharp knife and carefully took 6" to 8" cuttings from the rosette plant. Each cutting had a single rosette on a 6" to 8" stem. By the time I trimmed down this plant, I had enough cuttings to make two very full bouquets and some extra to work in between the rocks surrounding the pond.

I filled the pots 3/4 the way with regular garden soil. Then I started to insert the stems into the soil (working from the perimeter to the center) to resemble a rose bouquet. I used a small garden spatula to work in some extra soil in between the stems. Then I watered the plants well. I only water the plants again when the top of the soil is dry. If you keep the soil too wet, you can cause the stem to rot.

I have successfully propagated this plant using this method, but if you wish to take the safer route, allow a "scab" to develop over the end of the stem by allowing the cutting to dry out a bit, then dip the cutting in some Rooting Hormone before planting them in the dirt.


Wednesday, December 5, 2007

The Living Sculpture: Potted Succulent Art


I was shopping for some electrical tape when I saw these succulent beauties perched on a rack outside the store. I could not help but notice the vibrant colors, and striking contours of these plants. I was surprised some of them were flowering even in this cold weather. Anyways, at $3 a piece, I couldn't resist. They are just what I need to liven up my apartment.

There were too many to choose from, and I only have a limited space in my apartment garden so instead of potting each plant individually, I decided to create a large container featuring a medley of plants. I toyed with the idea of adding tumbled glass and rocks as a decorative element, but I preferred the minimalist look.

Creating this live sculptural art is easy! I provided step-by-step instructions on how to create your own succulent art below. I also included some helpful preparation and planning tips.


Materials:
  • Large, shallow container (At least 10" wide)
  • 3-4 succulent plants (depending on size of plant)
  • Coffee Filter or 4" x 4" Mesh Screen
  • Well-Draining Potting Soil
  • Decorative Elements like tumbled glass, large rocks, etc. (optional)

Instructions:
1. Plant Selection. This is probably the most difficult part of this project because you need to do more than choose plants that have interesting shapes and colors. You have to consider the watering and sunlight needs of each plant. Succulents will need more water during their growing period, but some succulents are summer growers and other succulents are winter growers. You also have to consider the plants' growth properties; will it grow vertically, horizontally, rapidly, etc.? If you have any doubts, you can read the plant description or ask a store employee.

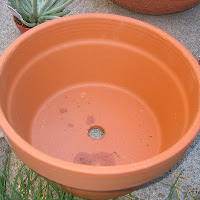
2. The Container. Choose a container that is wide and shallow. You can use a deep container if you wish, but it will be a waste of space. Succulent plants tend to have shallow roots and do not need a deep container. My plants came in plastic containers, but I like using terracotta containers. Terracotta pots are porous and allow water to evaporate quicker than plastic containers. Because succulents tend to die more from over-watering than lack of watering, I feel safer using the terracotta pots. I did not seal my pots for this reason and also because I like the earthy-dry look for these plants.


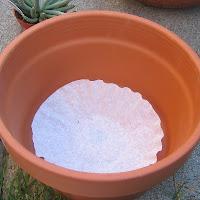
3. Lining the Container. Line the bottom of the container with a coffee filter or a 4" x 4" mesh screen to prevent the soil and minerals from leaching out from that large hole. The coffee filter is biodegradeable and will eventually break down with time so if I decide to bring this one inside, I will set this container on a plain 5" terracotta saucer.


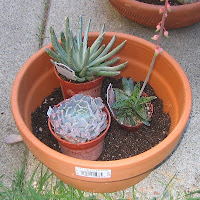
4. Arrange the Plants. Fill up about a 1/4 to a 1/2 of the container with soil. Then place the plants on top of the soil. Play with the arrangement of the plants until you are satisfied with a design. Remember to take in account the plants' growth characteristics.


5. Finish Planting Plants.
Fill dirt around the potted plants (and also below) so that the potted plants are snug and all have a level soil line. Remember to leave at least 1/2" of space from the soil line to the rim of the pot. You do not want water and debris overspilling every time you try to water your plants.
Remove one of the potted plants. Gently roll the bottom of the container in your hand until the plant slides free from the container. You can gently loosen the roots on the sides and bottom before placing the plant in the soil. Repeat for the other plants. When you are done gently pat the soil down around the plants and water pot thoroughly.


Note: Succulents are hardy plants. They do need to be watered, but they should not be over-watered. If you do the succulents will rot. You should only have to water the plant when the soil is thoroughly dry.