Translate

Custom Search

Naturopathica

Showing posts with label germinating seeds. Show all posts

Monday, April 30, 2012

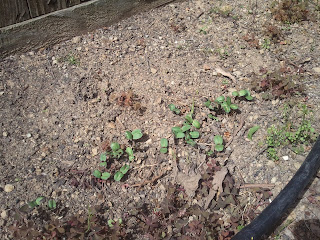
Sunflowers Emerging

Sunflowers Sprouting (2012)
Sunflowers Emerging 2012

Last year I harvested a lot of sunflower seeds.  This year I planted the seeds along the fence to create a wall of sunflowers.  I still have about a half of gallon-size Ziploc bag full of seeds from last year's harvest!

Saturday, April 28, 2012

DIY Apple Carton Seedling Starter

Apple Carton Seedling Starter

This empty apple carton looked like it could be a great seedling starter.  Keeping the soil evenly moist is critical in getting seeds to germinate, and as you can see in the photo above, this container traps moisture well.  This is my first time using this type of container, but I have high hopes.

DIY Apple Carton Seedling Starter

Materials:
  • Empty apple container or similar container.  We got this one from Costco.
  • Permanent Marker
  • Potting soil
  • Seeds
  • Water (use a hose with a mister nozzle, a spray bottle, or gently pour water from a cup)
  • Pen and Paper (to track what seeds you planted)
Directions: 
  1. Close the container, and number each dome.  This makes recording what you planted in each dome easier. 
  2. Open the container, and fill each space with soil.  
  3. Then plant your seeds in each pod, and make sure you write down which seeds were planted in each pod.
  4. Then gently water the soil in a way that does not disturb the seeds.  Water until the soil is moist, but not soggy.  
  5. Close the container and place it on a level surface in a shady area.  Then wait!  You should not have to water the plant for several days.  Only water the soil if it looks or feels dry to the touch.


Photo of Empty Apple Carton
Empty Carton

Photo of Empty Apple Carton Converted into Seedling Starter
Planting Seeds in Empty Apple Carton


Friday, September 30, 2011

Korean Star Melon Surprise

Photo 1: Korean Star Melon

Photo 2: Korean Star Melon Seedlings. 


I threw scraps of Korean Star Melon into my worm compost bin weeks ago.  When I checked on my compost bin, I discovered the seeds had sprouted!  I transferred the seeds into my garden.  Let's see what happens.

Tuesday, July 26, 2011

Planting Pumpkin Seeds for Halloween

Photo: Young pumpkin plant

I planted a couple of pumpkin seeds directly in the soil earlier this month.  I hope I planted them in time for Halloween!  I would love to have a porch full of Jack-o-Lanterns.

Sunday, April 17, 2011

Tomatoes: Transplants vs. Seeds


Although tomatoes are easy to start from seeds, I purchased several different varieties of heirloom tomato transplants from Home Depot.  They were selling them for $3.48 each, and they came in 5" peat pots.  So why did I purchase transplants if tomatoes are so easy to grow from seeds?

  1. Early Harvesting Time.  Transplants have been started indoors from seeds several weeks prior to the spring planting season.  This means my newly purchased tomato transplants will set fruit much earlier than a tomato plant started from seed during the normal planting season.  It will continue to set fruit until the first frost in fall.  
  2. Cheaper for People with Limited Gardening Space.  Unless you harvest seeds from an heirloom tomato from the market or can get them on the cheap, it may be slightly more expensive to buy a standard pack of seeds.  For example, Burpee is selling a packet of 50 Black Krim seeds for $3.95.  That packet of seeds cost $0.47 more than a transplant.
  3. Limited Space.  I do not need 50 Black Krim tomato plants.  I only want one for now.  I do not have the space for it, and I am more interested in having a variety of plants in my garden.  
  4. Free Future Seeds.  I can still easily save seeds from the tomatoes my transplants will produce this year, and start my own transplants early next year.   

Monday, April 4, 2011

Plastic Shopping Bag Greenhouse

Photo: Two transplant flats are placed side by side inside a Target plastic shopping bag.  
The handles are tied on the side.

You can easily start seedlings outdoors by growing them in individual greenhouses made out of old plastic shopping bags.  

The seeds in my outdoor garden were taking a long time to germinate so I decided to start some more seedlings in pots.  To accelerate the germination time, I transformed the pots into greenhouses by wrapping them in old shopping plastic bags and tying them shut.  I placed the wrapped pots in a sunny location, and checked the bags once a day to make sure the soil was still moist and to see if anything had sprouted.  

These shopping bags make a significant difference.

Early Corn Germination Times
Method                                                                        Days to Germination
Burpee Seed Starter Kit (indoors)................................. 4
Plastic Shopping Bag Greenhouse (outdoors)...............5
Direct Seed Planting in Garden (outdoors)...................13

To check out my other germination tips and methods click here.

Friday, March 25, 2011

Bell Pepper Plants from Scraps


Some people find it difficult to start bell pepper plants from seeds, but I find it really easy to start new bell pepper plants from kitchen scraps.  All you have to do is cut your bell pepper in half lengthwise.  Then scrape the seeds on to a paper towel or newspaper with your fingers or a spoon.  If you want to store the seeds, allow the seeds to dry out in a cool, dry place before storing them in a cool, dry area.  Otherwise, plant the seeds in soil.  


I planted my red bell pepper seeds in my new Burpee 72-Cell Greenhouse Kit on March 15, and 10 days later red bell pepper seedlings are beginning to emerge from the soil!  I planted one to two seeds about 1/4" deep in each cell.    

I am really impressed with the Burpee 72-Cell Greenhouse Kit.  It is easy to use, re-useable, mess-free, and really eliminates the guesswork in creating just the right environment for seeds to germinate.  I only had to do the initial watering of the Burpee seed cubes, and the cells are still moist 10 days later.  Just make sure all of the seed starting cubes are standing upright before pouring the hot water so they expand correctly.  


Thursday, May 6, 2010

Old Aquarium, New Greenhouse

Photo 1: Lettuce and Nasturiums growing in my re-purposed aquarium


A small crack developed near the top of my acrylic aquarium rendering it useless as an aquarium (See Photo 2).  Instead of throwing it away, I decided to re-purpose it as a greenhouse.   
First, I removed the filtration system.  Then I used pea gravel to create a one-inch drainage layer (See Photo 3).  I normally use hydroton clay balls because it weighs next to nothing, but I had some excess pea gravel from another project.  Next I placed screen mesh on top of the pebbles to prevent soil from settling into the drainage layer (See Photo 3).  Lastly, I added organic gardening soil and planted some seeds.  I am currently growing nasturtiums and lettuce for my pet tortoise (See Photo 1 & 4). 


My fish tank is already equipped with a fluorescent bulb light fixture, which gives me the option to grow plants even in the dimmest corner of my home.  I currently have mine placed in front of a window so I am not using the light at this time.  If you do need to use the light, I recommend purchasing an automatic timer so you can easily provide twelve (12) hours of light per day without the hassle of remembering to turn the light on and off.   

Photo 2: Old aquarium

Photo 3: Screen mesh placed on top of layer of pea gravel

Photo 4: Seeds germinated three days later.

Tuesday, May 4, 2010

Grow Avocados The Easy Way

Anyone can germinate avocados from seed!  Forget the toothpick method.  You do not even need any soil.  Just wash away the flesh from the avocado pits, and wrap the pits in a damp paper towel.  Then place the wrapped pits in a plastic bag.  I used a snack bag (See Photo 1).  After you seal the bag, place the bag in a warm, dark place.  I placed my bag on top of my refrigerator.  Now just ignore it for a few weeks.  It will take about two to four weeks for your pits to sprout (See Photo 2).  

  
Photo 1: Avocado pits have been cleaned, wrapped in a damp paper towel, and sealed in a snack bag.


Photo 2: Both avocado pits have germinated


Wednesday, February 24, 2010

In The Garden: New Seedlings


I planted some seeds in my re-useable seedling containers about a couple of weeks ago and left them outside.  I was afraid I might have jumped the gun on planting season because I was not seeing any signs of life the first week, but on the eighth day I discovered most of my seeds have sprouted.  The Cosmos and Calendulas were the first to emerge.  Now my African Daisies, Poppies and Gysophilas have also peeked through the soil.

Sunday, September 20, 2009

Re-Useable Seedling Starter


Re-useable Seedling Starter for Less Than $6

I bought this re-useable seedling starter for less than $6 from my local garden center. It's working well. The tray is designed in a way to help keep the soil moist. I planted butter lettuce, swiss chard, tomatoes, peas, butternut squash, nasturtiums, and thyme seeds. As you can see my swiss chard is doing really well here. Today I transplanted almost all of my seedlings. I'm just wait for a few more to grow to 3 to 4 inches before attempting to transplant them.

Friday, March 28, 2008

Space Saver: Germinate Seeds By Using The Plastic Bag Method


I received a bad batch of seeds, and wasted a lot of window sill space trying to get these puppies to germinate. I decided to use the plastic bag method with the remaining seeds to save space on my windowsill. The basic idea is to "plant" a lot of seeds in a bag, and only transfer the seeds that sprout. If you have never used this method before, it is a cool project to try out.

Note: I would not recommend using this method for very tiny or delicate seeds if you plan to transplant the seeds.

Materials:
  • Large Clear Ziploc bag or other clear resealable airtight bag.
  • Paper Towel
  • Water
  • Seeds
  • Pen
  • Spray bottle (optional)

Directions:

1. Wet a paper towel with water, and squeeze out the excess water. The towel should be moist, but not dripping wet. If it is too wet, the seed can "drown," develop bacteria and/or rot. If you have a spray bottle handy, you might want to use it to lightly mist the paper towel.

2. Spread out the paper towel and then drop the seeds on one half of the paper towel. Space out the seeds so that they are not too clumped together. Fold over the other side of the paper towel over the seeds, and gently press your hands over the edges and the spaces between the seeds. This will create a seal and keep the seeds from falling out.


3. Slide the paper towel holding the seeds inside the plastic bag. Seal the plastic bag. The bag will keep the water from escaping and provide constant moisture to the seeds, which is key to a successful germination.


4. Use the pen to label the bag. I write down the name of the plant and the date. Hang the plastic bag up. You can use magnets to fix the bag to the refrigerator or weave the top portion of the bag in and out of the window blinds. Then wait for the seeds to sprout.


5. Once the seeds sprout, remove them from the bag and plant them in the ground. Do not pull on the seeds or seedlings because you are likely to damage the tender root system. Just take two fingers, place one finger on either side of the seedling, press down onto the moist paper towel and gently pull or tear apart the paper towel to free the seedings. If a bit of the paper towel remains on the root system just leave it and plant the whole thing in soil. It will eventually break down. Discard all of the seeds that did not sprout.

Tuesday, January 1, 2008

Homemade Greenhouse: Germinate Seeds Easily Outdoors

Sowing seeds directly outdoors may be necessary if there is insufficient lighting in the apartment or if the apartment gardener only has a limited amount of space to work with. I'm beginning to start more seedlings outdoors because I am running out of my room in my apartment.

I did not have much luck at first. The soil would dry out too quickly preventing some of my seeds to germinate and the seeds that did sprout would shrivel up from lack of water. I lost some of my bulbs to the neighborhood squirrels. And sometimes slugs would attack my seedlings and eat all of the plant's tender shoots! I was able to solve all of these problems by creating a miniature greenhouse out of materials you probably already have in your home. Continue reading to learn how to make your own mini-greenhouse.

Homemade Greenhouse
  • Advantages:
    • Conserves water
    • Prevents birds, squirrels and other animals from eating your seeds
    • Protects your seedlings from slugs and other insects
    • Uses recycled materials
    • Requires less maintenance than sowing indoors
    • Reduces clutter in your home
    • Easier to adapt seedlings to outdoor environment
  • Disadvantages:
    • Seeds sowed outdoors germinated a bit more slowly than the ones I sowed indoors probably because of the differences in temperature.


Germinating Oregano Seeds Using a Homemade Greenhouse (left);
Oregano Seedlings (right)
  • Materials:
    • Container with draining holes
    • Old Ziploc bags or other clear bags
    • Seeds
    • Water
    • Optional:
      • Bamboo Stakes
      • Duct Tape or Large Rubber Bands
      • Plant Identification Marker
  • Directions:
    1. Fill your container with soil, leaving about 1/2" of space from the top of the soil to the rim of the container.
    2. Sow seeds according to the directions on your seed packet.
    3. Thoroughly water the soil (i.e., until water begins to drip from the bottom of the container).
    4. Place the ziploc bag or clear bag over the rim of your pot. You want the bag to stand somewhat erect. If the bag is saggy, just place a bamboo stake in the center of the pot to keep the bag from collapsing. It is not necessary for the bag to form an airtight capsule, but you do want the bag to fit snuggly over the pot to help trap moisture and to prevent the seeds or seedlings from drying out. If the lip of your bag is too wide, you can (a) gather some of the plastic around the rim of the pot until the bag forms a snug fit over the rim of the container and secure with a rubber band or duct tape, or (b) place a large rubber band over the bag and around the base of your pot.
      • Tip: The large ziploc bags are sturdy, and fits snuggly over a standard 6" terracotta pot. If you keep your pot outside and are expecting rain make sure you place a bamboo stake in the middle to keep the bag from collapsing.
    5. Place the container in a sunny location. As the sun warms up the soil, the water will rise, hit the plastic ceiling, and drip back down to the plant. Not only does this cut down on your maintenance time, but this also conserves water. You can go weeks without watering, but it is still a good idea to check in on your plant at least once a week.
    6. Leave the protective bagging on the plant after your seeds have sprouted. The plastic bag will deter slugs, insects, birds and other pests. Just make sure the plant leaves do not touch the walls of the plastic bag. If they do it is time to remove the bag. If you would like to continue to use the greenhouse method at this point, just upgrade to a larger bag.

Saturday, December 1, 2007

Dixie Cup Seedling Starter

Seedlings (from left to right): Red Bell Peppers, Sweet Basil, Plum Tomato, Black-Eyed Susan

This is an inexpensive and convenient way to start your seedlings indoors.
Materials:
  • Dixie Cups
  • Seeds
  • Potting Soil
  • Pencil or Pen
  • Water
  • Empty Water Bottle
Instructions:
  1. Fill a Dixie Cup at least halfway full. Leave at least 1/2″ space from soil line to the top of the cup.
  2. Press your pinky finger (or use the end of a pencil) to make an impression in the center of the soil. The depth of the impression will depend on the seed sowing instructions, but is usually between 1/8″ and 1/2″ deep.
  3. Place 1 or 2 seeds in the impression, and then lightly cover the seeds with soil.
  4. Gently pour water onto the soil.


    • Caution: Do not over-water the soil. You want moist soil, not soggy soil.
  5. Write down what you are growing on the cup to keep track of what you are planting.
  6. Place the cup on a sunny windowsill.
  7. Check the plants daily and keep the soil moist. The trick to getting seeds to germinate is to keep the soil moist and warm.


    • Tip #1 (Transporting Seedlings): You can place Dixie Cup seedlings on a tray or in a shallow box (e.g., shoe box) so that you can move several seedlings around at once. If you keep them in a box, make sure there is proper air circulation to prevent the growth of fungus.
    • Tip #2 (Watering Seedlings): When seedlings begin to sprout do not pour water directly on the tender seedling shoots. Spoon water directly on the soil around the seedling shoots.
    • Tip #3 (Retaining Soil Moisture): You can rest a piece of plastic wrap or other transparent material over the cups to help the soil retain moisture. If the plant shoots above the cup line, place clear plastic bags (like Ziplock bags) over a group of seedlings to create a mini-greenhouse tent.
    • UPDATE: It is a lot easier and more economical in the long run to use re-useable seedling starters.  The great thing about these miniature plastic pots is that they help keep the soil from drying out and they can be used over and over again.   
  8. Transplant seedlings when they are 3″ to 4″ tall.

    • Fill 4″ or 6″ pot with potting soil leaving about 2″ or 3″ of space. Place Dixie Cup in the center of the pot and continue to fill pot with soil. You want to leave about a 1/2″ of space between soil line and top of gardening pot. Water plant thoroughly.
    • Tip #4 (Removing Seedlings from Cup): Position the cup so that the seedlings point to the ground at about a 45-degree angle. Then roll the bottom half of the cup in your hand to loosen up the soil and slightly tap or shake until the seedling falls in to your hand. Place in the new pot.