Translate

Custom Search

Naturopathica

Wednesday, December 28, 2011

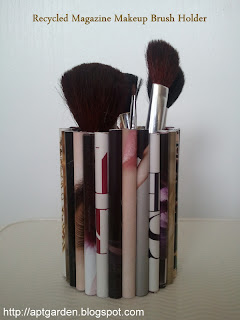
Recycled Magazine Makeup Brush Holder

Photo: Recycled Magazine Makeup Brush Holder

I finally got around to trying that recycled magazine project I blogged about earlier this year.  I decided to create a makeup brush holder by using pages from my Glamour magazine to decorate a tin can.  It was a lot easier than I thought, and it took me less than a couple of hours to complete this project.  Continue reading to see step by step instructions on how to create this makeup brush holder.


Materials

  • Scissors
  • Magazines
  • Ruler
  • Pencil
  • Tape
  • Rubberband
  • Tin Can (cleaned and dried)
  • Elmer's Glue
  • Glue Gun

Directions
  1. Tear out pages from your magazine that has a lot of pretty colors, prints, text and/or images. 
  2. Measure your tin can's height.  Then cut strips from magazines that are the same height.  For example, my tin can was about 4.5" so I cut sheets of paper that had a height of 4.5".     
  3. Then lay a single sheet down, and fold the rough edge of the paper about 1/4" so that you have a straight edge.  Then take the pencil and roll it so that the magazine wraps around the pencil.                                           

  4. Secure the tube with a small piece of tape (i.e., about 1/4" of tape).  Repeat this process until you have enough tubes to surround the entire tin can.                                                                                   
  5. Wrap the rubber band around the tin can.  Then slip the tubes of magazines under the rubber band to see if you like your design.                                                                       
  6. Plug in your glue gun, and place two droplets of glue at the top and the bottom of the can (See Photo with yellow stars below).  Then place the first tube down.  Make sure that it is align with the bottom of the can.  Then place a thin layer of glue on the side of the tube (See Photo with pink start below).  Place another thin layer of glue on the tube, and then place two more droplets of glue on the can.  Then secure with another tube.  Repeat this process to the end. Secure with a rubber band until project dries. 


Saturday, December 24, 2011

Winter Gardening in California

I love California for many reasons, but one of them is being able to garden throughout the winter!  Here are some of the things still growing in the garden in December:

Photo: Romaine Lettuce

Photo: Bok Choy

Photo: Mustard Greens

Photo: Cilantro

Photo: Salad Greens going to seed

Photo: Bell Pepper

Photo: Fennel going to seed

Photo: Tomato seedlings planted in late summer

Photo: Scallions (Green Onions) going to seed

Photo: Pineapple plant grown from planting pineapple head

Photo: Lemon grass shoot given to me by a friend

Our zucchini plant was also still producing zucchini, but I uprooted it because the zucchini were small.  Carrots, onions, shallots and garlic are also still growing as well as sage, English thyme, lemon thyme, rosemary, parsley, and oregano.  Our lime tree is still flowering and setting tiny fruit.  

In general, the plants are growing at a much slower rate.  I think next year I will try row covers or set up cold frames to see if that will improve growth.    
 

Monday, December 12, 2011

Harvesting Tarragon Seeds

Photo 1: Flowering Tarragon Herb


Photo 2: Tarragon Seeds (left); Tarragon Flower Heads (right)

Tarragon is an herb with a licorice-like taste.  The plant produces yellow flowers that eventually develop seeds.  See Photo 2 above.  To get the seeds, just break the dried flower heads.  The black slivers are tarragon seeds.

Saturday, November 19, 2011

Personalized Address Planters


These personalized crocks would make a wonderful housewarming gift and a nice addition to your own home.  Personalize these crocks with your family name and/or street address and then set them on the porch or walkway.  Black, blue and green colored fonts are available.  They are currently $59.95 at Plow & Hearth, and you can get free shipping by using coupon code: PHFSN.  Other Plow & Hearth Coupon Codes Available Here: http://aptgarden.blogspot.com/p/savings.html.

Monday, November 14, 2011

Better Homes and Garden Holiday Store

BHG Holiday Store

One of my favorite magazines, Better Homes and Garden (BHG) has a Holiday Store! Currently, you can get $3.95 shipping on any order, any size.  You can shop by issue or by topic.  They also have holiday exclusives! For example, you can get 40% off holiday fruit boxes and get free shipping as well.


BHG Holiday Store

Cover Those Gray Roots in a Pinch

Photo Credit: Everyday Goddess

So you are getting ready for a hot date or an important meeting, but as you are primping yourself in the mirror all you can see are those pesky gray hairs staring back at you reminding both you and the world that you are not that young anymore.  Well, here's a quick, inexpensive tip for covering up those gray hairs in a pinch.  All you need is eye shadow in the same shade as your hair color, an eye shadow brush, and if you wish some hairspray.

Materials

  • Eye Shadow in the same shade as your hair color.  I have dark brown/black hair, and I use Cover Girl  eye shadow in "brown smolder" #740.  It works great as a brow liner too.  Target only charges $0.49 shipping for this item, and it costs $2.98 before tax. 
  • Inexpensive or old Eye Shadow Brush. You can also get a complete set of brushes at Tmart.com for about $4 or individual brushes as low as $1.  Shipping is FREE.
  • Hairspray (optional).  I use a fine hairspray to give my roots a light spritz.  I allow it to get tacky, and then apply the power to my roots.  It's not necessary, but I think it makes the powder stick to my roots longer.    

Directions

  1. Style your hair as usual.
  2. If you want to use hairspray, give you roots a very light spritz of hairspray.  
  3. Dip your eye shadow brush in the eye shadow while you are waiting for the hairspray to get tacky.  This should only take a few seconds.  
  4. Then start covering your gray hairs with the powder.  I use small, short strokes...think stippling.  Avoid getting the powder on your scalp.  

Saturday, November 12, 2011

Today's Finds: Grass Animals

Alpaca ($4.29 + Free Shipping)
Puppy ($4.38 + Free Shipping)
Bunny Rabbit ($4.42 + Free Shipping)
Squirrel ($4.43 + Free Shipping)


These are so adorable, and a fun way to dress up your desk this winter.  
They are crafted out of artificial grass so there is no need to water or maintain it.    
They are under $5 each and shipping is free at Tmart.com.

Friday, November 11, 2011

Happy Veteran's Day!

Glamour ran an article called "31 Days of Giving."  The article gives readers 31 ways to give back to people.  You can read the online version at Donating to Charity: 31 Days of Giving by Glamour.com.  The article inspired me to compile a list of ways to help our troops and their families in the spirit of Veteran's Day.

  • Send a teddy bear to the child of a deployed marine.  For $25, jonathancollins.org gives a plush toy with a voice message recorded by the parent, which will play when the paw is pressed.
  • Show your support for our troops. A donation to woundedwarriorproject.org can aid a soldier’s physical—and emotional—recovery after deployment.
  • Support the troops with warm socks, deodorant, Cheez-Its: Find their wish lists at anysoldier.com.
  • Staying home for the holidays? Donate frequent-flier miles to injured soldiers’ families at heromiles.org
  • Buy a counseling session for a soldier returning home after serving in Iraq or Afghanistan with your $17 donation to www.giveanhour.org.

Thursday, November 10, 2011

Pumpkin Update

Photo: Jack-o-Lantern from the Garden

I planted pumpkin seeds in July, but as you can see our pumpkin was not quite ready for carving.  My daughter and I decided to carve the pumpkin anyways.  We were inspired by the jack-o-lantern in the Bubble Guppies episode about Halloween.  We both bonded over the experience, and were happy with the final product.  Next year, I will try planting the seeds in June, and will use a lot more organic fertilizer.

Sunday, November 6, 2011

Free Christmas Cactus by Mai


Photo: Christmas Cactus, Free Plant of the Month by freeplantsbymail.org

Free Plants By Mail (freeplantsbymail.org) was started by local growers as a way to use the surplus plants from nurseries and also as a way to support The Nature Conservancy.  Free Plants By Mail offers a new free plant each month.  This month they are offering Christmas Cactus.  Although the plant itself is free, you do have to pay a small shipping and handling fee of $6.95.
This organization also has over 100 plants available for sale on their site.  100% of the proceeds from the sale will go to The Nature Conservancy.
Click here to view Frequently Asked Questions (FAQ).

Friday, November 4, 2011

Send Postcards to Our Troops for Free


You can create and send a postcard to our troops by visiting: http://www.cosmopolitan.com/cosmo-kisses-postcard.  Cosmopolitan and Maybelline New York will donate $1 to USO for each postcard sent.*

Many of my family members and friends are in the military.  They do so much for us, and I know that they will appreciate the fact that we took the time to write them a kind message.  So please take a few minutes to show them your appreciation!  

*Up to $20,000.

Wednesday, October 12, 2011

Cow Mug

I love my cow mug! This little guy never fails to bring a smile to my face every morning! 

I am also in love with Italian Sweet Creme flavored creamer by Coffee-Mate.  I wasn't a regular coffee drinker before, but I am now. 


Monday, October 10, 2011

Reduce Your Magazine Clutter

Photo: Magazine Binder

If you subscribe to several magazines like I do, you know that those magazines can easily pile up.  Perhaps this would not be such a bad thing if you actually read those magazines again, but let's be honest --- we rarely do.  So let's tackle that clutter in a smart way.

How to Create a Magazine Binder

Materials:
  • large 3-ring binder (Note: You could always upgrade to a larger binder later, but I like starting big)
  • dividers with tabs/labels
  • ordinary binder paper (college-ruled or wide ruled)
  • scissors
  • Elmer's school glue or glue stick (Note: I prefer using Elmer's school glue)
  • Stapler (for keeping multi-issue articles together)
  • High-quality 3-hole punch (optional)

Directions:
  1. I use a binder for each major subject that interest me.  For example, I have a binder just for "Home & Garden" related issues.  Then I use dividers to divide the binder into subjects.  For example, I have a section on each room in a house, and the front and backyard.  
  2. As I read magazines, I tear out images or articles of interest and just glue them (or staple them if it is a multi-page article) to a piece of lined binder paper.  You can also use a three hole punch on full page articles.  Sometimes I jot quick notes next to the item or article.  Then I file the paper under the appropriate section.  
  3. After I am done reading the magazine, I am left with a magazine full of advertisements or articles that did not interest me so I just put it in the recycling bin.  

Friday, October 7, 2011

Apartment Gardeners Can Compost

Photo 1: Thick top layer of hand shredded newspaper

Photo 2: Shredded newspaper, egg shells, carrot tops, coffee grounds, and banana peel decomposing

Photo 3: Red worms working on scraps.


Photo 4: Finished compost ready to use directly in garden or to make compost tea.


For apartment gardeners and people with small gardens, I suggest trying a worm compost bin.  The bins are cheap (less than $10), requires little square footage of space, and are easy to make.  You will also have finished compost in less time than you would with a traditional compost bin.

Indoor Worm Compost Bin
I used to keep a worm compost bin under the kitchen sink in a small plastic container with holes on top.  I use handfuls of finished compost to make compost tea (i.e., mixture of finished compost and water).  Compost tea stretches out finished compost so I can provide nutrients to several plants.

For those of you who are hesitant about keeping worm compost bins indoors, I promise you my bin did not have any bad smells or fruit flies nor did any worms every try to escape.  The key is to keep the bins under the right conditions.  This may sound difficult, but it is not.  The environment must be cool or warm (but not hot), moist but not soggy, and not overloaded with kitchen scraps.  Note: I only fed my worm bin broken egg shells, fruit and vegetable scraps.  I also chopped or crushed scraps when I could to accelerate the time it took to get finished compost.  I also placed a layer of moist, shredded newspaper on top of my scraps to prevent fruit flies from discovering my bin.  If you notice the bin getting soggy, you can give the liquid to plants or place shredded newspaper at the bottom to absorb the liquid.  

Outdoor Worm Compost Bin
Now that I have more space, I created a large worm bin and placed it outside near the back door.  I love it!  The worms quickly break down all my scraps.  It is important to keep a thick layer of moist shredded newspaper on top of the scraps to keep the fruit flies to a minimum.  See Photo 1.  The fruit flies do not hurt the worm bin; They actually help break down the scraps.  I just try to discourage their presence because they are annoying.  Make sure you keep the medium moist or else you might attract ants. If ants ever attack your bin, just use a hose with a mister attachment and moisten the scraps and newspapers.  The ants should disappear in a day.

I am considering creating a second bin.  The bins are easily stackable because I drilled holes on the sides of the bin instead of on top.  My adult red worms have already produced several baby red worms so I will have plenty of worms for a new bin.

Wednesday, October 5, 2011

Harvesting Marigold Seeds

Photo 1: Dried marigold flower head full of seeds

Photo 2: Dried orange petal fluff removed.  Base of plant is holding a bunch of marigold seeds.
 
Photo 3: Base of plant holding a few marigold seeds.

Photo 4: Bag full of marigold seeds

My marigolds are dying back in the garden and the stems have turned brown, which means it is time to harvest the marigold seeds.  Collecting marigold seeds will take very little time and effort, and you will end up with an abundant supply of marigold seeds.  Share them with friends or grow them next year from seed.    

Marigolds are easy to grow from seed, are pretty, drought-tolerant, and are very hardy plants.  I plant marigolds throughout the vegetable garden because the roots secrete a substance that kills nematodes.  The smell of marigolds also deter some pests that munch on other crops (e.g., whiteflies).     

How to Collect Marigold Seeds

Materials: 
  • Plastic snack bag or other seed container
  • Small rock or weight if using a plastic bag
  • Scissors
  • Bowl

Directions:
  1. Identify flower heads that have died back, and where 1 to 2 inches of the stem has turned brown.  See Photo 1.  Snip off these flowers (with the stems) and place them in a bowl.  
  2. Place a small rock or weight in your bag to keep it from flying away.
  3. Using your fingers, remove the "orange fluff" (i.e., the dry, brittle marigold flower petals) and discard them.  I throw the fluff right back into the garden.  See Photo 1 & 2.
  4. Several marigold seeds (i.e., black and tan slivers)  are in the base of the flower.  See Photo 2 & 3.  
  5. Remove the seeds and place them in the plastic bag.  Seal the bag when you are done.  If you used dried flower heads, then you should not have any condensation.  If you do notice condensation inside the bag, re-open the bag and allow the seeds to completely dry out before storing them.     


Monday, October 3, 2011

Harvesting Butternut Squash

Photo 1: Butternut Squash Flower

 Photo 2: Young butternut squash growing on the fence. 


Photo 3: Butternut squash almost ready for picking

Photo 4: Butternut Squash Harvested (unwashed)

I am a huge fan of butternut squash soup!  I planted 2 butternut squash plants earlier this year, and they have taken over the garden.  So far we have harvested 3 nice size butternut squash, and there are still more to come.  During the growing season, I snipped off any small, rotting butternut squash and threw them away to help redirect energy to the healthy butternut squashes.

The butternut squash are ready to be picked when there are no longer green streaks on the skin, and the stem has turned brown.  Cut the squash from the vine, leaving at least an inch of the stem attached.  Disinfect the butternut squash by dipping it in a weak bleach solution, and then dry the squash.  Store the squash in a cool, dark place.  When stored properly, butternut squash can last several months.